

Introduction
Text classification is a supervised machine learning task where text documents are classified into different categories depending upon the content of the text. Some of the most common examples of text classification include sentimental analysis, spam or ham email detection, intent classification, public opinion mining, etc. Rule-based, machine learning and deep learning approaches have been developed for text classification. Deep learning approaches for text classification are further divided into two types: Supervised learning and unsupervised learning. In this article, you will study a supervised deep learning technique for text classification.
Goals
The main goal of this article is to demonstrate how to perform text classification with deep learning using Python deep learning libraries. As an example, you will create a deep learning model capable of detecting spam messages. After reading this article you will be able to solve general text classification problems such as sentimental analysis, intent detection, news article classification, etc with Python. You will also learn word embeddings that are used as input for a variety of natural language tasks such as topic modeling, text generation, chatbot development, etc. You will be using Python's Keras library to implement your deep learning model.
Prerequisites
The code provided in this article is written in Python 3, therefore you are expected to have at least an intermediate level of Python knowledge. The code has been executed and tested with Google Colaboratory which is an online deep learning platform. You can also run the code locally on your PC. You will need to install TensorFlow's Keras library in order to execute the code. Here is a very good article on how to install TensorFlow Keras on Windows. Linux users can check out this tutorial. Basic knowledge of machine learning is also assumed.
Step 1: Problem Statement & Dataset
Given a set of text messages, we want to develop a deep learning model capable of telling which of the messages are spam. Machine learning and deep learning models learn from datasets. Therefore, we need a dataset that contains ham and spam messages.The dataset we are going to use to develop our deep learning model can be downloaded from this kaggle link. Download the CSV file into local computers, or if you are training your models with any cloud library, you will need to upload your CSV file to the corresponding platform.
Step 2: Importing Libraries
Execute the following script to import the Python libraries required to execute scripts in this article.# -*- coding: utf-8 -*-
"""
Created on Sun Sep 22 11:48:17 2019
@author: usman
"""
import pandas as pd
import numpy as np
import re
import nltk
from nltk.corpus import stopwords
from numpy import array
from keras.preprocessing.text import one_hot
from keras.preprocessing.sequence import pad_sequences
from keras.models import Sequential
from keras.layers.core import Activation, Dropout, Dense
from keras.layers import Flatten, LSTM
from keras.layers.embeddings import Embedding
from sklearn.model_selection import train_test_split
from keras.preprocessing.text import Tokenizer
import matplotlib.pyplot as plt
from numpy import array
from numpy import asarray
from numpy import zeros
%matplotlib inline
Step 3: Dataset Analysis
In this step, we will import the dataset into our application and will perform some exploratory data analysis. The read_csv method from the Pandas library can be used to import the dataset.ham_spam = pd.read_csv("/content/drive/My Drive/datasets/ham_spam.csv")We will remove all those rows where the dataset contains a null value.ham_spam.dropna(inplace = True)The shape attribute of the pandas dataframe can be used to view the shape of the dataset.ham_spam.shapeIn the output, you should see (5572, 2) which shows that the dataset contains 5572 rows and 2 columns.Let's now see the first five rows of the dataset using the head method of the pandas dataframe.ham_spam.head()Here is the output:
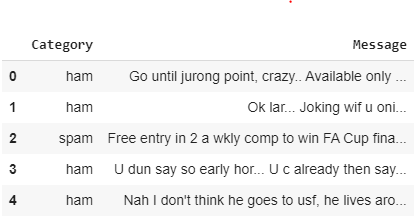
The output shows that the dataset contains two columns: Category and Message. The Category column contains information regarding whether a text message is spam or ham, while the Message column contains the actual text of a message.Let's plot a pie graph which shows the distribution of ham and spam messages in the dataset. Let's first increase the plot size since the default plot size is a bit too small.plot_size = plt.rcParams["figure.figsize"]
plot_size [0] = 8
plot_size [1] = 6
plt.rcParams["figure.figsize"] = plot_size The following script plots the pie graph for two categories of messages in the dataset.ham_spam.Category.value_counts().plot(kind='pie', autopct='%1.0f%%', colors = ['skyblue', 'orange'], explode = (0.05, 0.05))Here is the output:
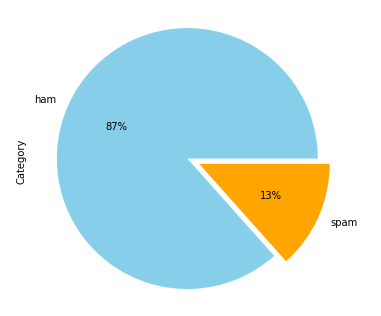
The output shows that 87% of the messages are ham while only 13% of the messages are spam.
Step 4: Data Cleaning
Text messages contain multiple empty spaces, punctuations, special characters, etc. It is a good practice to clean the text by removing special characters and punctuations before classification. Hence, we will write a method that accepts a text string as a parameter and returns a text string without punctuations and special characters.def clean_text(mes):
# Remove punctuations and numbers
message = re.sub('[^a-zA-Z]', ' ', mes)
# Remove single characters
message = re.sub(r"\s+[a-zA-Z]\s+", ' ', message)
# Remove multiple spaces generated due to single character removal
message = re.sub(r'\s+', ' ', message)
return messageThe following script cleans the text messages in our dataset:message_list = []
texts = list(ham_spam['Message'])
for text in texts:
message_list.append(clean_text(text))
Step 6: Splitting Data into Training and Test Sets
In order to create robust deep learning models, the dataset used is divided into train and test sets. The deep learning models are trained on the training set. The performance of the trained models is evaluated by making predictions on the test sets. An ideal deep learning algorithm should perform equally well on training and test set.Deep learning algorithm works with numeric data. However, the categories in our dataset have two unique text values i.e. ham and spam. We will replace ham by 0 and spam by 1. To do so, execute the following script:labels = ham_spam['Category']
labels = np.array(list(map(lambda x: 1 if x=="spam" else 0, labels)))The following script divides our data into training and test sets. 80% of the data will be used to train our deep learning model while 20% of the data will be used for evaluating the model performance.X_train, X_test, y_train, y_test = train_test_split(message_list, labels, stratify = labels, test_size=0.20, random_state=42)
Step 7: Embedding Words to Numeric Vectors
In the previous section, you saw we replaced text labels by binary digits 1 and 0. To train deep learning models, we also need to convert our text messages into the numeric format. There are different approaches to convert text two numbers such as a bag of words, TFIDFI, n-grams, etc. Furthermore, a variety of prebuild word embeddings also exist such as Google Word2Vec, Stanford's Glove, etc. We will be using Stanford's Glove word embedding in this article.First of all, we need to convert our text to a series of integers, depending upon the words in the text. To do so, we can use the Tokenizer class from the keras.preprocessing.text library.tokenizer = Tokenizer(num_words=4000)
tokenizer.fit_on_texts(X_train)
X_train = tokenizer.texts_to_sequences(X_train)
X_test = tokenizer.texts_to_sequences(X_test)The Tokenizer class converts text to numbers. However, since text messages can be of different lengths, the integer representations created by Tokenizer class also vary by length. In order to create uniform length vectors, we can specify a specific length for all the vector and then truncate the vectors longer than that length. For the vectors, smaller than the specified length, we can add zeros at the end. This process is called padding. Padding can be implemented via pad_sequences class from the Keras.preprocessing.sequence . Look at the following script:vocabulary = len(tokenizer.word_index) + 1
sen_length = 200
X_train = pad_sequences(X_train, padding='post', maxlen=sen_length )
X_test = pad_sequences(X_test, padding='post', maxlen=sen_length )The vocabulary variable contains the total number of unique words in the dataset. The sentence length is 200 which means that each sentence will be represented by a numeric vector of 200 integers.Next, we need to create a dictionary that contains words and their corresponding vector representation as specified by Stanford's Glove library. The following script does that:embeddings_dictionary = dict()
glove_file = open('E:/Datasets/Word Embeddings/glove.6B.100d.txt', encoding="utf8")
for line in glove_file:
records = line.split()
word = records[0]
vector_dimensions = asarray(records[1:], dtype='float32')
embeddings_dictionary [word] = vector_dimensions
glove_file.close()Finally, we will create an embedding matrix where each row index will correspond to the integer value of the words as specified by the `Tokenizer` class. The value for each row will be the corresponding Glove representations for the words.embedding_matrix = zeros((vocabulary, 100))
for word, index in tokenizer.word_index.items():
embedding_vector = embeddings_dictionary.get(word)
if embedding_vector is not None:
embedding_matrix[index] = embedding_vector
Step 7: Training the Models
In the previous steps, we converted our data into a format that is required to train deep learning algorithms. Now is the time to train the model itself. Several deep learning models can be used for text classification. However, Long Short Term Memory (LSTM) network has shown excellent performance with sequential data. Since sentences are basically sequences of words, we will use LSTM to create text classification model. With Keras, LSTM can be implemented in less than 10 lines of code as shown below:model = Sequential()
embedding_layer = Embedding(vocabulary, 100, weights=[embedding_matrix], input_length=sen_length , trainable=False)
model.add(embedding_layer)
model.add(LSTM(16))
model.add(Dense(1, activation='sigmoid'))
model.compile(optimizer='adam', loss='binary_crossentropy', metrics=['acc'])In the above script, we create LSTM model with 16 neurons. The Embedding layer specifies the word embeddings that will be used to convert input text to numbers. The activation function is sigmoid, the loss function is binary_crossentropy since there are only two possible outputs. In the case of more than two output labels, you will use categorical_crossentropy, the performance metrics is accuracy.To train the model, you simply need to call the fit method and pass it our training set.performance = model.fit(X_train, y_train, batch_size=128, epochs=10, verbose=1, validation_split=0.2)And that's pretty much. The above script trains the model. When you run the above script, you should see the following output:Train on 3565 samples, validate on 892 samples
Epoch 1/10
3565/3565 [==============================] - 11s 3ms/step - loss: 0.6523 - acc: 0.8715 - val_loss: 0.5963 - val_acc: 0.8430
Epoch 2/10
3565/3565 [==============================] - 10s 3ms/step - loss: 0.4672 - acc: 0.8715 - val_loss: 0.4498 - val_acc: 0.8430
Epoch 3/10
3565/3565 [==============================] - 10s 3ms/step - loss: 0.3841 - acc: 0.8715 - val_loss: 0.4374 - val_acc: 0.8430
Epoch 4/10
3565/3565 [==============================] - 10s 3ms/step - loss: 0.3837 - acc: 0.8715 - val_loss: 0.4366 - val_acc: 0.8430
Epoch 5/10
3565/3565 [==============================] - 9s 3ms/step - loss: 0.3837 - acc: 0.8715 - val_loss: 0.4386 - val_acc: 0.8430
Epoch 6/10
3565/3565 [==============================] - 10s 3ms/step - loss: 0.3838 - acc: 0.8715 - val_loss: 0.4393 - val_acc: 0.8430
Epoch 7/10
3565/3565 [==============================] - 10s 3ms/step - loss: 0.3841 - acc: 0.8715 - val_loss: 0.4386 - val_acc: 0.8430
Epoch 8/10
3565/3565 [==============================] - 10s 3ms/step - loss: 0.3837 - acc: 0.8715 - val_loss: 0.4404 - val_acc: 0.8430
Epoch 9/10
3565/3565 [==============================] - 10s 3ms/step - loss: 0.3841 - acc: 0.8715 - val_loss: 0.4422 - val_acc: 0.8430
Epoch 10/10
3565/3565 [==============================] - 9s 3ms/step - loss: 0.3839 - acc: 0.8715 - val_loss: 0.4382 - val_acc: 0.8430Our model achieves training accuracy of 84.30%.
Step 8: Evaluate Model Performance
To evaluate the performance of the trained model on the test set, you can use the evaluate method.score = model.evaluate(X_test, y_test, verbose=1)
print("Accuracy on Test Data:", score[1])Here is the output:1115/1115 [==============================] - 4s 4ms/step
Accuracy on Test Data: 0.8663677136994263 The output shows an accuracy of 86.63% which means that out of 100 predictions, 86.63% of the time our model correctly predicts whether or not a message is a spam.Let's now plot the training and validation loss and accuracy achieved while training the model.import matplotlib.pyplot as plt
plt.plot(performance .history['acc'])
plt.plot(performance .history['val_acc'])
plt.title('accuracy')
plt.ylabel('accuracy')
plt.xlabel('epoch')
plt.legend(['train','validate'], loc='upper left')
plt.show()
plt.plot(performance.history['loss'])
plt.plot(performance.history['val_loss'])
plt.title('loss')
plt.ylabel('loss')
plt.xlabel('epoch')
plt.legend(['train','validate'], loc='upper left')
plt.show()Here is output:
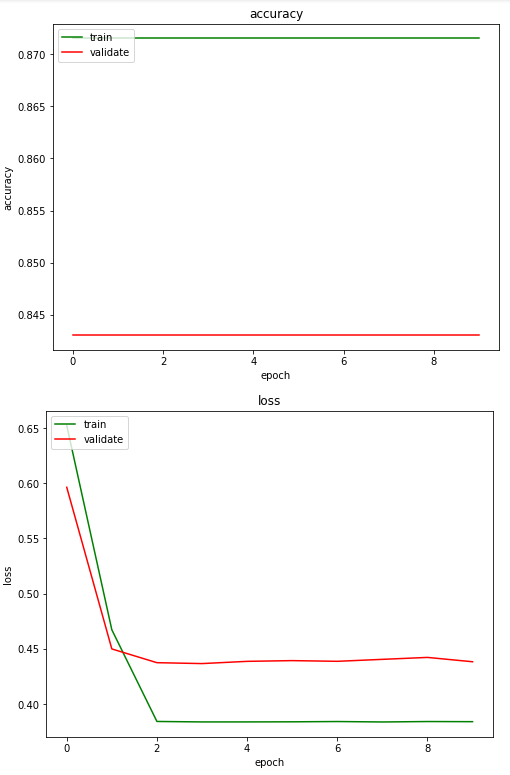
The output shows that the model achieves maximum accuracy in its first epoch (one epoch refers to one training cycle on the complete dataset). On the other hand, the model achieves minimum loss at around second epoch.
Conclusion
Text classification is one of the most common natural language processing tasks. This article explains the basics of text classification with deep learning. In this article, you saw how to identify whether a text message is spam or ham. The trained deep learning model achieves an accuracy of 86.63 on the test set without any parameter tuning. I would suggest you change the parameter and see if you can get better results. Feel free to comment in case if you have something to say or if you want to ask any question.


